
tl;dr
At Datagma, every time someone fills a form (sign up form, newsletter form...), he is sent to our CRM, Intercom.
We created a Zapier automation that will trigger every time a new user appears on Intercom (and so on Datagma): We automatically find his LinkedIn URL, and then we send a connection request through Lemlist.
Why engage your user on linkedIn ?
In this article, you will learn a new LinkedIn automation growth hack that we (and thanks to our API hundreds of high-growth SaaS companies) use to engage new sign-up users and close more sales.
But first, why engage new users ?
Because acquiring leads and free users is hard. And if you are like most SaaS companies, you are spending a big chunk of your marketing budget on acquiring new users. However, as they say, “leads and free users do not pay the (server) bills”.
To convert leads into paid users, you create product demos. Product demos improve conversions by 20-50% for most B2B SaaS companies. Product demos can also shorten your onboarding process.
Although time consuming, individual product demos are so important because they are personal, you can answer any doubts and objections your lead might have regarding the product, and by giving a demo, you have already shown how to use the product “successfully”.
With product demos, when you help your leads figure out a way to solve their problem, they want to reciprocate by becoming a paid user.
Especially if your LTV (Customer Lifetime Value) or ACV (Average Contract Value) is more than $1000, a product demo is one of the most powerful tools in your sales process. One of your KPIs or conversion goals should be to maximize the product demos.
At this point, if you don’t have a product demo for your SaaS, this should be your priority. But if you have a product demo, ask yourself how you can increase your demo requests by 10% or 20%.
To optimize your demo conversions, you need to understand why your leads are not asking for a demo.
- Do they understand your product well enough?
- Do they understand the goals they are trying to achieve with your product?
- Are they familiar with your user experience?
- What questions do they have that you can answer at this stage?
- Why should they see a demo before jumping straight into your product?
A lot of times, leads don’t feel the need to request a demo because of 4 reasons:
- They believe they can figure out how to use your product on their own
- They believe that your product should be easy to use and shouldn’t need a demo
- They are not sure if your product will solve their problem so they don’t want to spend time learning about your product
- They believe that product demos calls are sales calls
- Most product demos are boring - often walking leads through the features, rather than solving the problem they have
At this stage, rather than selling your product, you should sell your demo. You want your leads and prospects to realize that a product demo is critical to solving their problem.
Three steps to increasing product demo requests using this secret Linkedin automation hack
A great way to increase your product demo requests is to reach out to your newsletter subscribers or leads personally on Linkedin.
Why does that work? Because nobody’s expecting it. That’s right!
When you show a demo request form as part of onboarding, at that point you are stopping users from doing their job they wanted to do in the first place i.e. to solve their problem by using your product.
So when you reach out to them on Linkedin with a personal message, they feel like you care about their success. You are also putting a face to your company. Before that, they didn’t know who to talk to if they had any issues or needed help.
Reaching out to every subscriber might feel like a lot of work, but with this secret Linkedin automation workflow, you can do that at scale while still personalizing your messages.
Note that this is not an approach to cold email to a list of professionals or other email automation most marketers use.
These are your leads and subscribers who have engaged with your product or brand and these people have shown interest in your product. They already know about your product or service, so half the battle is over.
Your job is to show them that you are here to understand their use case and their problems, that you care and that you want them to be successful with your product.
Ready to learn this secret?
Here’s how you can automate your Linkedin outreach to subscribers and convert more sales by increasing product demos requests. There are 3 steps to the process.
- Step 1: Add subscriber to your CRM as a contact (Intercom)
- Step 2: Find their Linkedin profile URL using a data enrichment tool (Datagma)
- Step 3: Send a Linkedin connection request and a message using a Linkedin automation tool (Lemlist)
You might have noticed that each step uses a different tool - a CRM, a data enrichment tool and a Linkedin automation tool. In order to make this whole process completely automated, we are going to use Zapier.
This is how the process looks like in a Zapier workflow:

Let’s have a deeper look into each step.
Step 1: Add new sign ups to your CRM
When someone subscribes to your newsletter or downloads a whitepaper, they fill out a form and give you their email address and maybe, their name and company.
If you created the form using your CRM, then you don’t need to do anything. The contact details of the subscriber are already in your CRM.
But if your form is separate from the CRM, then you need to use tools like Zapier or Integromat to add the details to your CRM or you may already have an API to connect both the form and the CRM.
We use Intercom in our company so we’re going to take that as an example, but you can use any CRM you like as long as they have a Zapier integration or a Zapier app available. You can check a list of Zapier apps here.
The important thing to note here is that it’s best to tag your contact with the right entry point or the source such as newsletter, whitepaper, lead, etc. depending on how that contact was created.
When you have a new user or a contact in the CRM, the Zapier workflow is triggered. At this step, it will pull all the information from your CRM, including the email address, names, tags, etc.
Step 2: Find their Linkedin profile URL using Datagma
The next step of this workflow is to find the Linkedin profile URL of the contact using Datagma. You can find all the details about Datagma’s integrations on Zapier here.
Datagma is a data enrichment tool that can find over 100+ data points about a contact and their company just from their email address or their name and company name.
Create a Datagma account first in order to use this automation.
Since you already have the email address (and possibly their names and company name) of your subscribers or leads, Zapier will feed this information to Datagma and pull out all the key data that you need for launching your Linkedin connection request campaign including the Linkedin profile URL, of course.
Using leads’ names and company names will give you a higher accuracy than using their email addresses so when possible, use that.
It is important to know that before you set up the Zapier workflow, you need to create a campaign in the Linkedin automation tool (Lemlist, in this case) which will be used as an action in Zapier.
Step 3: Send a Linkedin connection request and a message using a Linkedin automation tool
Now that you have the contact’s Linkedin URL thanks to Datagma’s data enrichment tool, the last step is to send a Linkedin connection request via Lemlist.
Create a Lemlist account first in order to use this automation.
Lemlist’s Linkedin automation campaign will simply pick up the Linkedin URL of each contact and send a connection request. Use variables such as first name, company names on Lemlist to personalize your emails.
If you want to further personalize your emails, you can use the tags to create an “icebreaker” like: “I noticed that you subscribed to our newsletter” or “Did you like the whitepaper we wrote on…”.
Once you have created the campaign, you can now integrate Lemlist with Zapier. You can also check all of Lemlist’s integrations on Zapier here.
Now that you understand each step clearly, here’s how to set it up.
How to setup this Linkedin automation step by step
Step 1: Create a campaign on Lemlist
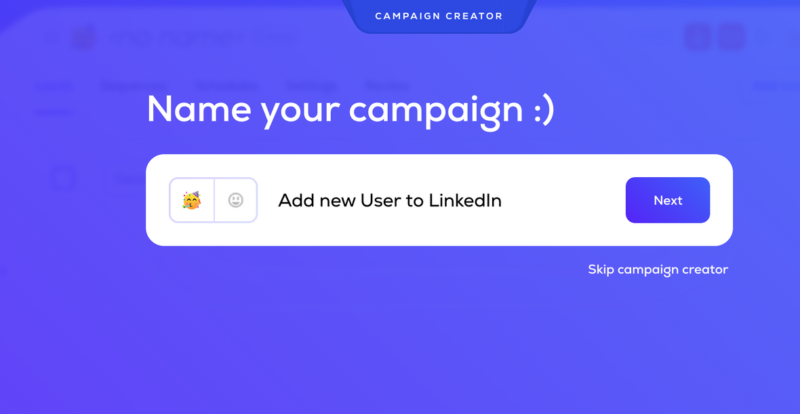
Head over to your Lemlist account and sign up. Click on “New Campaign” and add name to your campaign.
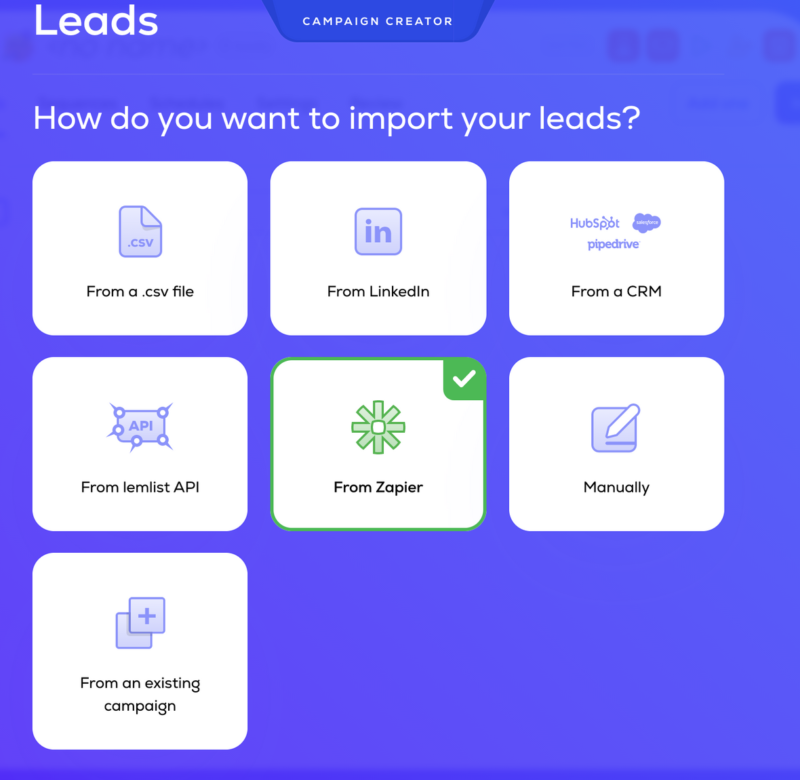
Next, choose how you want to import the leads. There are several options to import leads viz. from a .cave file, from LinkedIn, from CRM or manually, etc. In this case, select “From Zapier” because you are going to use Zapier automation to feed leads information to Lemlist.
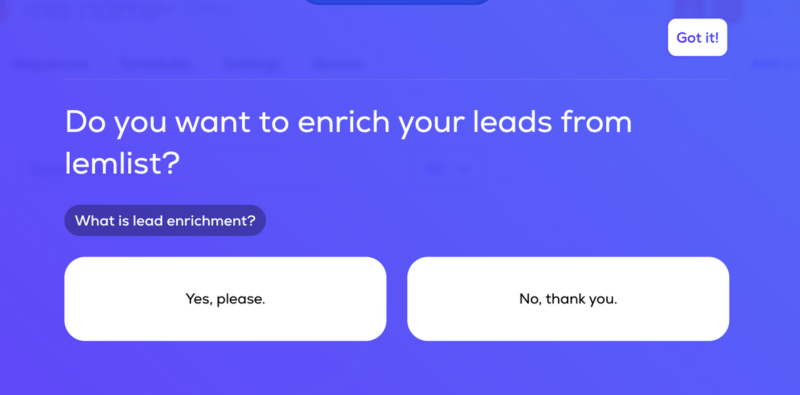
Then, you will be asked if you want to enrich your leads from Lemlist. You can skip this step or hit “No, thank you” because you already have enriched the leads from Datagma.
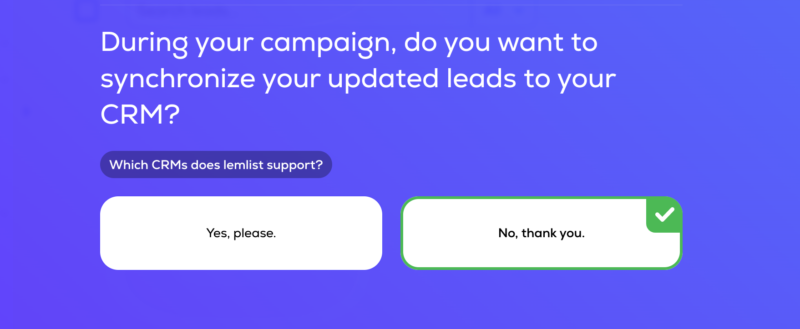
Do you want to synchronize your updated leads to a CRM? Select “yes”, if you want to feed the campaign details to your CRM like intercom or Hubspot. Otherwise, select “No”
Next, select the schedule at which you want to send this campaign. Do you want to send connection requests only on specific days? You can choose it here.
In this case, we want to reach out to people every day, weekends included.
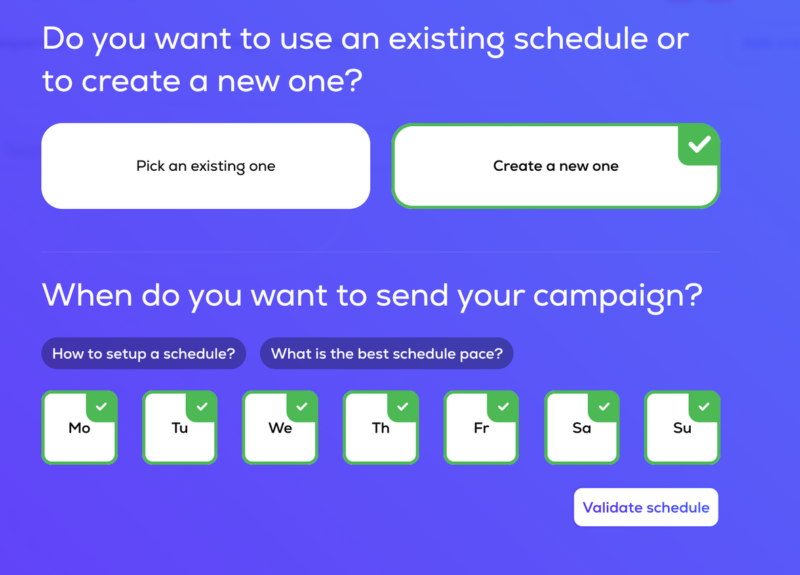
Next, select the frequency of the campaign. If you have hundreds of leads or subscribers per day, select a short interval of 2-5 minutes. However, if you only have less than 100-150 subscribers each day, you can select an 8-10 minutes interval.
If you select 2 minutes, the automation will send a connection request to the leads 3-4 minutes after a lead signs up because the first 2 steps of the Zapier workflow are near-instant.
Next, create the sequence and select “Linkedin Invite Only” campaign.

Fill out your message in step 2 with a waiting delay of 1-2 days.
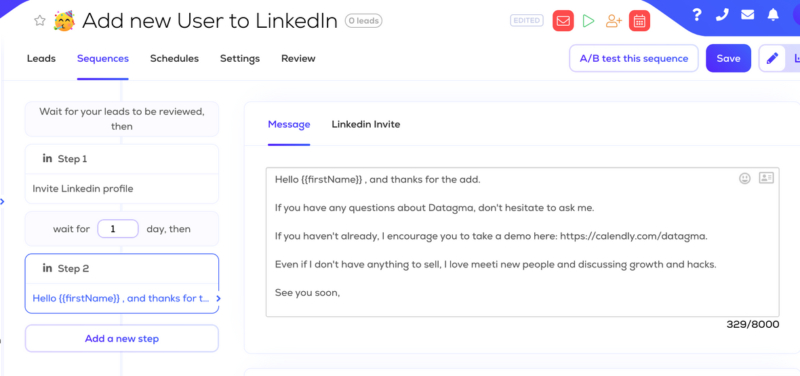
Personalize your message based on the lead magnet a lead downloaded. This is the step where you need to be creative and engaging with your leads.
Remember they have engaged with your product and they already know and value your product. Your job is to offer help in their journey of using your product without being sales-y.
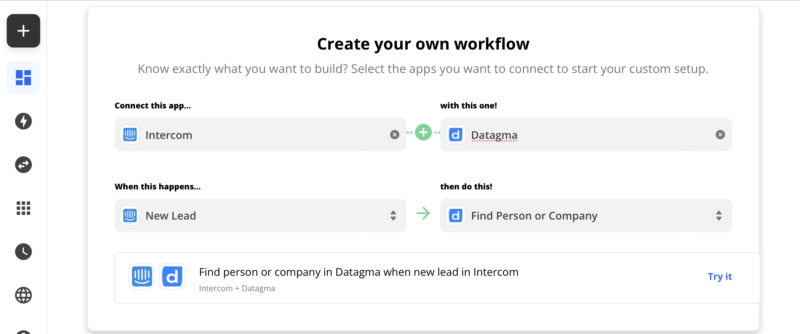
Step 2: Connect and add Intercom and Datagma apps in the Zapier workflow
Search for Intercom and Datagma apps in the Zapier and create the first step of the workflow. Select the trigger as “New lead” for intercom and the action on Datagma as “Find Person or Company”. Hit “Try it”
This step will be triggered as soon as there’s a new lead or a subscriber added to a particular list in Intercom.
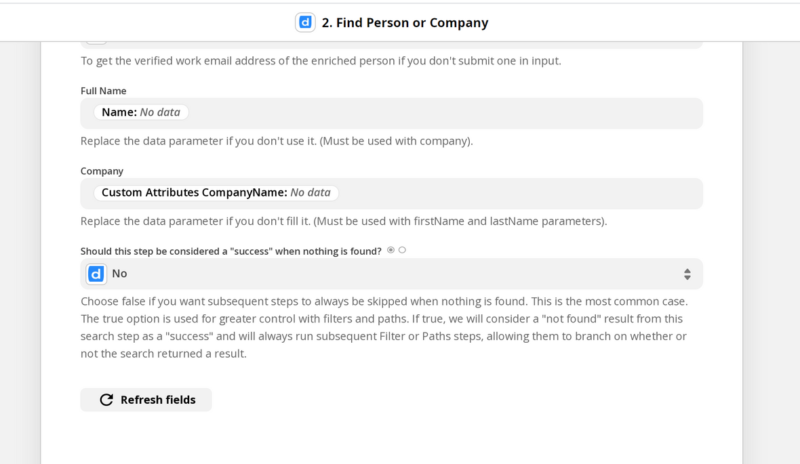
Step 3: Fill out the Datagma fields in Zapier
In this step, you are adding necessary information to the Datagma app i.e. Name and Company.
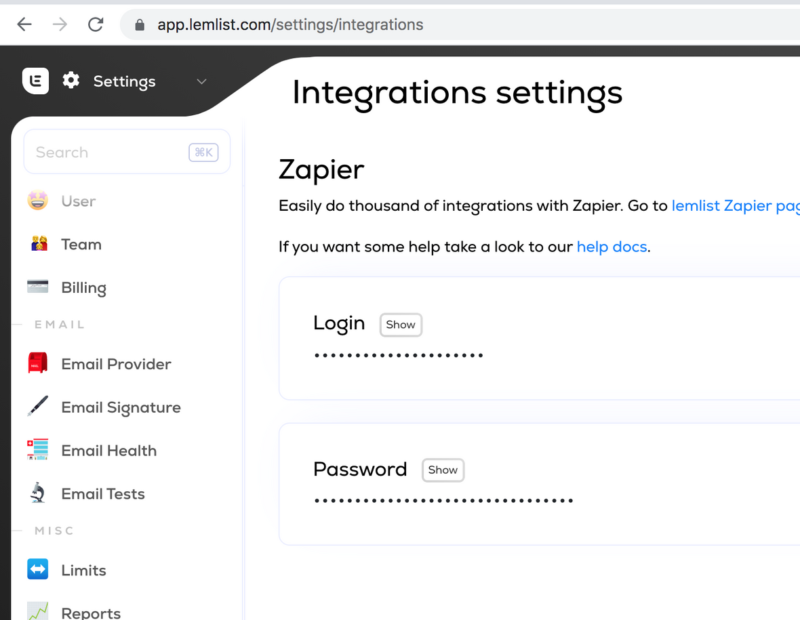
Step 4: Connect Lemlist and add it to the Zapier workflow
Search for the Lemlist app and connect to it. You will be asked to enter a login and password which you can find in your Lemlist settings.
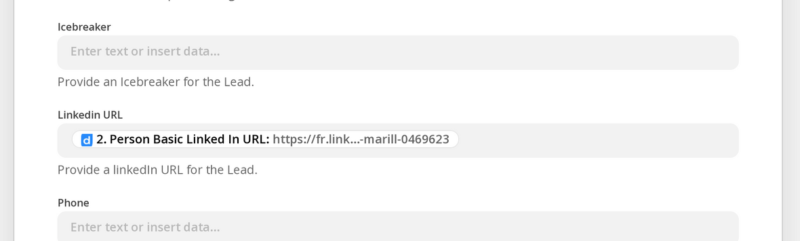
Once connected and logged into the right account, fill up the information required viz. email address, campaign on Lemlist to launch.

Next, select “Person Basic Linkedin URL” to add the Linkedin URL in your Lemlist campaign.
Hit “Save and Launch” to run the Zapier workflow.
This is it. Now you have a fully automated way of contacting any of your leads or newsletter subscribers on Linkedin without doing anything manually.
Send out your messages and increase your product demo requests and close more clients. And if you do it, let us know how many demos you were able to close using this little growth hack!
Happy “demo-ing”!