At Datagma, every time someone fills a form (sign up form, newsletter form…), he is sent to our CRM, Intercom.
We created a Zapier automation that will trigger every time a new user appears on Intercom (and so on Datagma): We automatically find all the details about him and his company. Then, based on the criteria defined in Zapier, we assign a score to him.
If the score is high enough, we trigger an alert on Slack to help us engage him as soon as possible.
How you can prioritize lead by leveraging Datagma data
If you’re getting tons of B2B leads and sign ups but can’t follow up with every lead, you need to prioritize your leads.
The problem is that not all leads are equal and not everyone will become your customer. Prioritizing your leads can save you a ton of time and wasted efforts on bad leads or cold leads so that you can focus on the right leads.
Lead prioritization is a method to score and rank your leads based on certain criteria or actions they take, and help you define how valuable a lead is to your business. If you have created an ICP or Ideal Client Profile in your business, then you have already finished the hardest part of automating your lead prioritization.
In this article, we will show you how you can automatically prioritize any lead that comes into your CRM by connecting Datagma through a Zapier integration.
You can do this with any CRM such as Intercom, Pipedrive, Hubspot or even if you have a basic Google spreadsheet as your CRM.
In this lead prioritization process, we want to do 4 steps:
- Step 1: Identify lead in Intercom and add the trigger
- Step 2: Enrich the lead using Datagma
- Step 3: Prioritize and filter the leads
- Step 4: Get lead notification on Slack with enriched data
To set up this integration, head over to Zapier and find the Zap for your CRM. We’ll use Intercom for the purpose of this article, but you are free to use any other CRM.

Step 1: Identify lead in Intercom and add the trigger
Connect to your Intercom account and select the trigger as “New user” for intercom. This will trigger the zap when a new user is created on Intercom.

This step will be triggered as soon as there’s a new user which could be a newsletter subscriber or somebody who downloaded a whitepaper.
Step 2: Enrich the lead using Datagma
Find and connect to the Datagma app in Zapier.

Next, select the event: “Find Person or Company”.

This event will find over 75 data points related to the lead and the company such as contact name, LinkedIn profile, Seniority, Job Title, direct dial, their company name, size, company phone, address, technologies used, funding amounts, Alexa Rank, Advertising Platform, traffic sources, exact number of employees, etc.
Enriching your data using Datagma is the key to prioritizing your leads. Once you have all the information about a lead, you can give them a score and take action on the high priority leads.
Next, select the data field that you already have and want to enrich. If you already have their email address, you can use just that to enrich the data. Otherwise, you will need to contact name and their Company Name both to find the rest of the data.
In this case, we are going to input the contact name and company name to enrich our file.


You now may select various options based on what information you want to enrich. For example, in order to get the financial information of the company, you can select the “Full Company” option.
To get the LinkedIn information of the company where your contact works, select the “Company Premium” option.

Step 3: Prioritize and filter the leads
Now that you have enriched data using Datagma and have a lot more data about your lead, you can select the criteria to prioritize leads.
To do this, we will use the app called “Filter by Zapier”.

In this step, we are going to add criteria for filtering out the leads that we don’t want to take action on and only allow leads that fulfill the criteria.
If you already know your Ideal Client Profile (ICP), this step should be easy. Otherwise, take some time to define who the right leads are for your business.
Just to give you an example, we want to be notified when a lead is either an owner or a C-level executive in a SaaS CRM company.
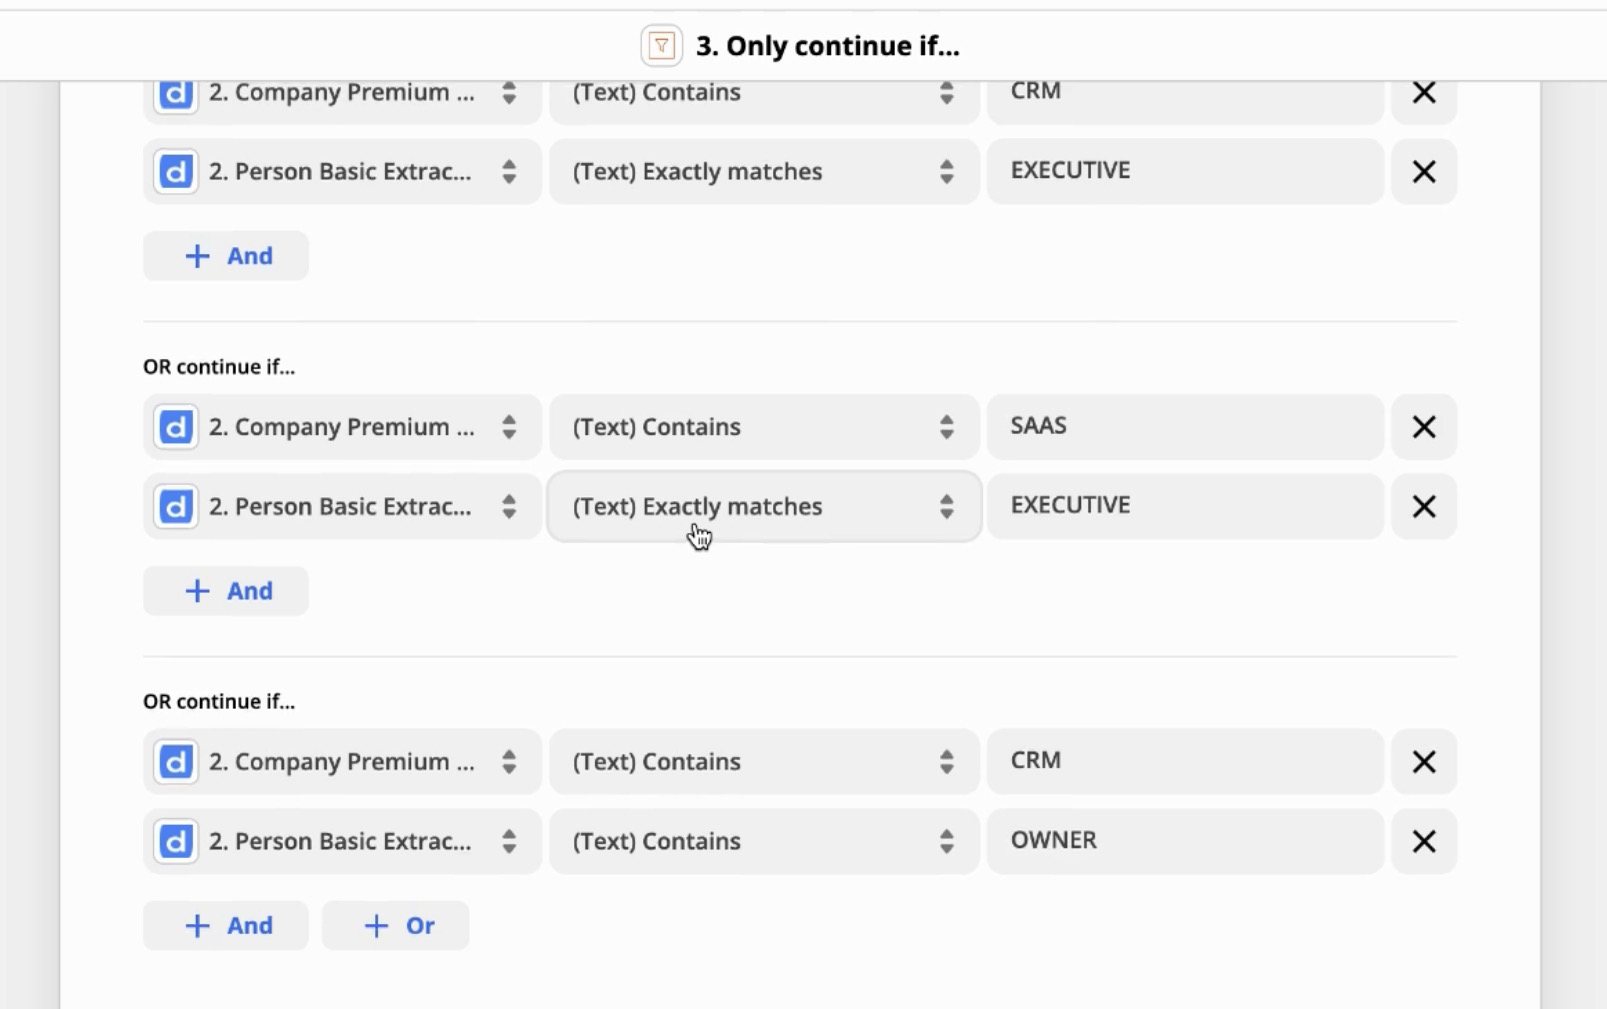
To do this, we are going to say continue if only:
the company has a CRM tag attached to it and the contact is an executive
OR the company has a SaaS tag attached to it and the contact is an executive
OR the company has a CRM tag attached to it and the contact is the Owner.
You can see how we configured it below:

In order to keep this easy, we are showing you a simple filter but feel free to create filters with several criteria such as:
Filter leads from anyone in a company that raised $10M
Filter leads whose role is Marketing and company size is more than 50 employees
Filter leads who is VP Sales in a company with more than 50 employees and uses Intercom tool
Step 4: Get lead notification on Slack with enriched data
In this step, we are simply going to send all the required information of the filtered leads as a message on Slack. For that, select the action “Send Channel Message”.

Next, select the Slack account and the channel where you want the notifications. We selected the “general” channel for this example but you can create a private channel for your leads, if you want to limit access to only a few people in your company.

Last thing to do is create a custom message template which will be sent to your Slack channel with the relevant information.
Here you can add as much information as you want depending on what action you want to take after a lead arrives in your Slack channel.
For example, if you want to send them a LinkedIn connection request, add the LinkedIn URL of the lead in the message itself.
Add a phone number, if you want to contact them immediately. And if you want to know which technologies their website is using, you can add that in the message itself.
Take some time to really decide what information will be useful for you to see with your lead notification.

Remember to test and review at each step so that you don’t encounter any problems later on.
If everything works fine and you can see the lead data in the Zapier, you can turn on the zap.
This is how the message will appear in your Slack.

If you get a ton of leads and do not want to spend hours following up with all of them, you need to prioritize your leads. Use this process to prioritize leads based on your ICP and filter out the low-priority leads so that you can focus on converting high-priority leads.